Introduction
XNA is a .NET framework .NET for game development, which casual game developers have been using since 2004 for ease of create games for Windows, XBOX and, most recently, Windows Phone. The framework provides:
- an integrated content pipeline
- load functionality for game assets, textures, fonts, 3D models, animations
- sound management
- user input tracking (keyboard, mouse, gamepad and touch)
- a good game logic organized in a straightforward game loop architecture
Game development is not trivial and XNA is a great framework to start with for novice game developers and/or students and developers who wants to learn how to create quality game applications. XNA, together with Visual Studio, make it as easy as: File -> New -> XNA Game Studio Project and you are ready to start.
MonoGame is an open-source and cross-platform implementation of XNA 4.0 and its class model. The goal of MonoGame is to provide XNA developers with a framework to build applications that will run on Xbox 360, Windows, Windows 8, Windows Phone and providing the ability to port the game (using the same C# codebase and minimal effort) to run natively on the iOS, Android, Mac OS X and Linux platforms. With these goals in mind, it's easy to understand the MonoGame motto: "Write Once, Play Everywhere". The technologies that make the MonoGame API cross-platform power possible are:
- OpenTK - a low-level C# library that wraps OpenGL, OpenCL and OpenAL for 3D graphics.
- SharpDX - an open-source implementation of the full DirectX API for .NET, which allows for development of high performance games, 2D and 3D graphics rendering and real-time sound.
- Lidgren.Network - a .NET networking library to easily handle network connectivity, leveraging UDP sockets to provide an high-level API for connecting a client to a server, reading and sending messages.
In this tutorial serie we are going to develop a Windows 8 game from scratch, leveraging MonoGame e XNA. These technologies do not represent the only way to develop games for Windows 8: it is also possible to develop games using native C++ and DirectX, in order to enable an easier existing game porting from other platforms by software houses and game developers. In this serie we will not talk about C++ and DirectX, maybe in the future.
Development Environment
Before you can write games for Windows 8 using MonoGame, you must setup your enviroment and your IDE. Below you can find all the steps to follow (in the order stated) to successfully prepare your computer for XNA Development with MonoGame:
- Install "Microsoft Windows 8"
- Install "Games for Windows"
http://www.xbox.com/en-US/LIVE/PC/DownloadClient
- OPTIONAL - ONLY IF VISUAL STUDIO 2010 or WINDOWS PHONE 8 SDK WILL NOT BE INSTALLED
**Visual Studio 2010 Express for Windows Phone ** http://go.microsoft.com/fwlink/?LinkId=258412
Why Visual Studio 2010? In XNA there is a feature, the Content Pipeline, which is a pre-compiler step to prepare and optimize graphic and audio assets for use at runtime in XNA (binary .XNB files). This feature is not implemented in MonoGame. In order to prepare contests, it is possible to use the Microsoft Content Pipeline, only available in Visual Studio 2010 + Windows Phone SDK 7.x or Visual Studio 2012 + Windows Phone 8 SDK. If you don't want to install Windows Phone 8 SDK or Visual Studio 2010 + Windows Phone 7.x SDK are already installed, this step can be avoided.
- Install "Visual Studio 2012"
or
Visual Studio 2012 Pro/Premium/Ultimate: from DreamSpark, MSDN or any licensed copy
- Install "Windows Phone 8 SDK"
http://go.microsoft.com/fwlink/?LinkId=265772
ONLY IF VS2010 Express per Windows Phone or VS2010 + Windows Phone 7.x SDK have NOT been installed
Obviosly, if you also want to develop apps and/or games for Windows Phone 8, you can install this package.
- Install "MonoGame 3.0" Windows Installer:
With MonoGame 3.0 a Windows Installer has been provided to install the MonoGame and SharpDX libraries needed to create an XNA 4.0 project for Windows 8. This will also install two MonoGame templates for use within Visual Studio to start an XNA/MonoGame project.
Create a MonoGame project
Any MonoGame-based project for Windows 8 start with the following steps:
Step 1 - Create a MonoGame project and set its references
Open Visual Studio 2012 and select New Project. Under Templates, select Visual C#, you should see the MonoGame project templates listed. Select the MonoGame Game (XAML). Name the project Win8Game and ensure that the option to "Create directory for solution" is checked.
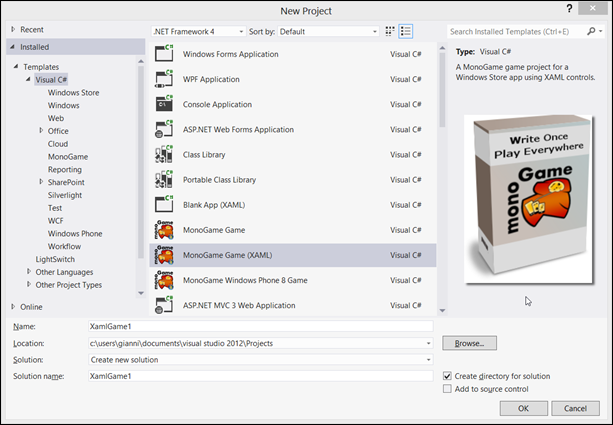 Figure 1 - Visual Studio 2012 with MonoGame templates
Step 2 - Test MonoGame environment
Now, let's test to see if your MonoGame environment is set up correctly by running the application either via Local Device or and via the Windows Simulator. If your setup was successful, you will see a blue background, created by default with any XNA Framework template projects.
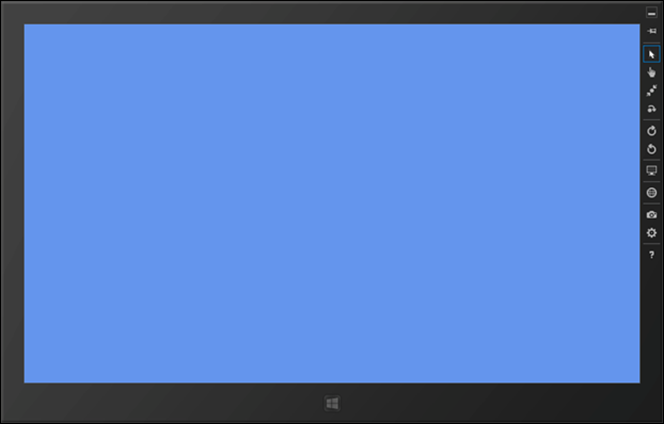
If it doesn't work or there are compilation errors, check MonoGame references (following step 3 instructions).
Step 3 - Add MonoGame references (optional)
Follow these Steps ONLY if MonoGame has been download and/or recompiled from source or in case there have been problems with MonoGame templates, pointing to the correct MonoGame references. If you installed via the MonoGame Installer, these operations should not be required.
We need to ensure that the Solution has the correct references to the MonoGame Framework and its dependencies. Right click on your Solution in the Visual Studio Solution Explorer and select Add -> Existing Project.
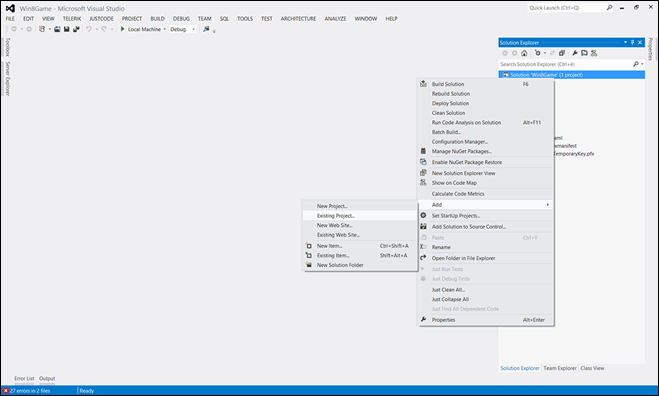
Figure 2 - Add an existing project to Solution
Browse where you downloaded MonoGame source code (i.g. C:\Users[user]\Documents\Projects\MonoGame**). Select the folder named MonoGame.Framework. In this folder, you will find the MonoGame.Framework.Windows8.csproj project file. Select this file and click on Open.
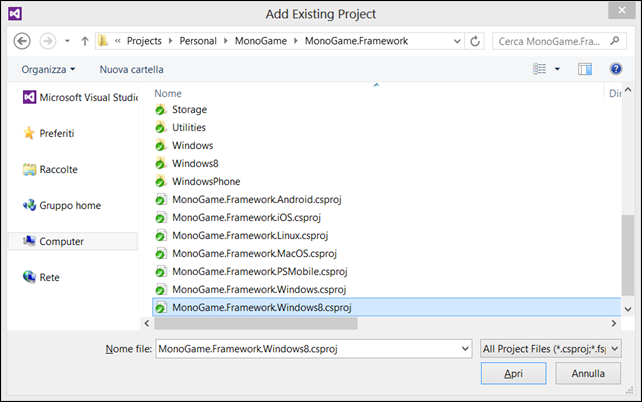 Figure 3 - Add MonoGame.Framework.Windows8 project to Solution
Once the project has been added to the Visual Studio Solution, right click on the MonoGame.Framework.Windows8 project, and select Clean. Then right click on the project again, and select Build. You may see a few warnings once you build the project, but don't worry: it's normal.
Now select the Win8Game solution, select References, right click and select Add Reference. In the Reference Manager, we need to add the reference to the MonoGame.Framework into the Windows 8 project by selecting Solution and then Projects. Select the checkbox beside the MonoGame.Framework project. Click OK (Figure 4). Then again, go back into Reference Manager and add the MonoGame Framework Dependencies by selecting Browse. Browse to location: C:\Users[user]\Documents\Projects\MonoGame\ThirdParty\Libs\SharpDX\Windows 8 Metro and select all of the .DLL files within the folder. Click on OK to confirm.
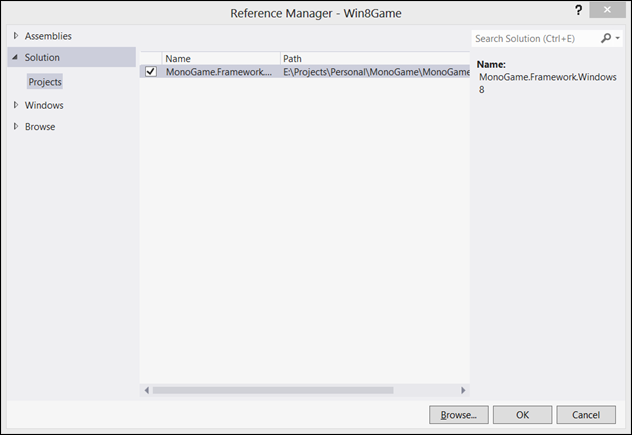 Figure 4 - Add MonoGame Framework and its dependencies
Finally, select the Win8Game project and right click. Select Project Dependencies and select the checkbox next to MonoGame.Framework.Windows8. Click OK and Rebuild the entire Solution. You may get warnings, but if you have followed the steps correctly, there should be no errors.
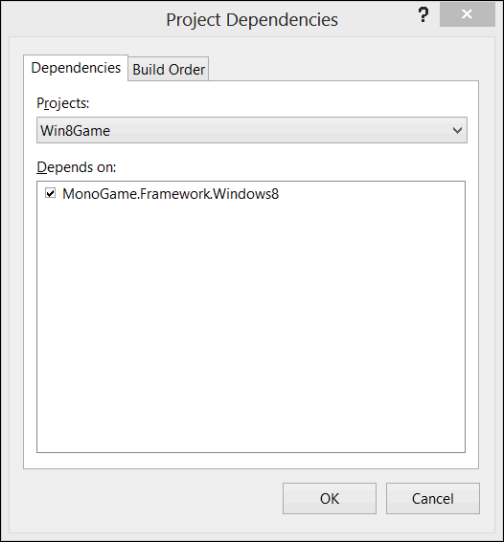 Figure 5 - Add MonoGame.Framework project dependency
You are now ready to start building your Windows 8 games. In the next post of this series, we will add the first base game items.
